Also, before getting into today's post (a step-by-step tutorial on cutting large fish into professional looking steaks at home), let me clearly state that other than select pelagic species, fish, especially salmon, are not safe to eat raw unless frozen to -4 degrees Fahrenheit (-20 degrees C) for a week. This is much colder than most household freezers go. If the fish is not frozen to this temperature for the duration stated above you are risking some seriously bad parasites that can not even be seen in the meat. Additionally salmon spinal fluid contains a toxin that is not harmful to humans but can kill dogs. So please do not feed your dogs bone-in salmon!
The butchering technique outlined below is one that my brother and I learned from the locals and applied to some tropical barracuda we speared in Cozumel, Mexico about 12 years ago.
My girlfriend and I got out again and again trying to land river run salmon over the past couple of weeks. While I had some momentary hook ups, we were unable to bring a fish to shore. However, our new buddy Allen (who has fished the spot we were at for the last 15-20 years) was landing fish like it was going out of style! So, in Allen's truly selfless style, he gave us two whole fish!
It was then that I searched the recesses of my brain, pushing aside dirty jokes, anthropological theory, quotes from childhood skate videos and other useless information to access a fish processing method I had not practiced in years.
This is how to "steak out" a large fish.
Step I: Begin by locating the gill plate right behind the pectoral fin just as you would for making the initial cuts for filleting. Place a sturdy filleting knife (this one my brother brought back from spearfishing in South Africa) or cleaver perpendicular to the body of the fish and make a cut stopping at the backbone.
Step II: Next, you will need to give a firm hit or two to the back of your knife blade with a wooden stick, rolling pin, or some other wooden object (*avoid hitting the knife with harder objects to keep from damaging the knife).
Step III: Once through the backbone, continue slicing with the knife until the head is detached. Set the head aside but do not discard it! There is still a ton of good meat on there and we will get to that at the end!
Step IV: Decide whether you want thick or thin steaks and place your knife accordingly on the fish and slice again down to the spine. I usually make salmon steaks about one inch thick.
Step V: Strike the back of the blade again with the wooden billet to sever the backbone and then continue slicing down to the cutting board to free the first steak.
Step VI: Continue with this process until you feel that the steaks are getting a bit small. Then switch over and follow step VII to fillet the tail.
Step VII: Place the knife just above the spine and start your initial cut towards the tail. *Be VERY careful here as you are cutting towards your hand! After about an inch or so, you will switch your grip on the fish to be sure that if the knife slips you will not cut a finger.
Step VIII: Switch your grip on the fish as shown below to keep your fingers out of the way as you fillet. Keep in mind your blade should be just bumping the top of the spine as you cut.
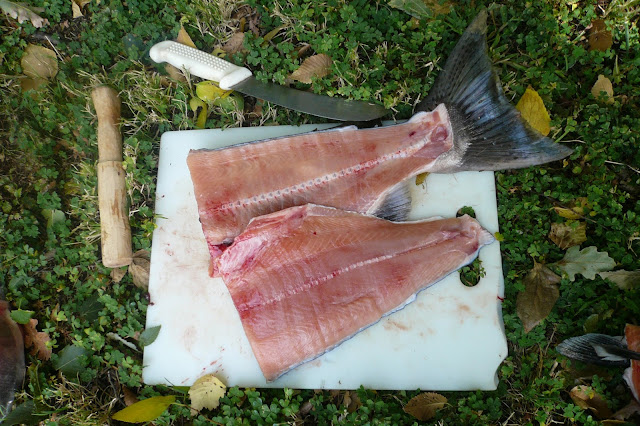
Step IX: Continue through to sever the skin and free the first fillet keeping you anchor hand out of the path of the knife as shown above. Keeping the skin on the fillet is great for grilling, smoking, or freezing. If you want to see how to take the fillet off of the skin, search my blog for "How to fillet a fish." The resulting tail fillet pictured here is 100% boneless.
Step X: Repeat filleting on the other side of the fish. Do not discard the backbone as there is a lot of meat on there. Instead give the tail a cut with the knife and billet method to remove the tail fin, and set the backbone aside.
Step XI: Now lets remove the collar from the head. The fish's collar is one of my all time favorite parts. However, this part of the fish largely goes unused by western anglers... and I do not know why! Fish collar is fantastic when grilled, broiled or smoked. It is fatty, meaty, and incredibly flavorful!
Start by severing the last connections under the chin. Then use the billet and knife system again, just behind the gill plate to free the collar. Pectoral fins may also be removed from the collar in this way.
As we retained the head for a Korean fish head soup, the only waste out of this whole fish is pictured below!
Step XII: Rinse your fillets in salt water to keep bacteria down and vacuum seal and refrigerate or freeze. Now use the fish head and remaining backbone for an incredible fish head soup! I will post a link to the recipe once it is published.
That's it!
Keep the old ways alive!


