Deadfall
This
post is dedicated to my buddy Nicolas who asked me to write a bit on the
subject, and to my other buddy Nick whose grandmother foraged and snared small
game in the forest feeding his mother and her siblings for years during
Stalin’s rule in post WWII Russia when times were really tough and money was
scarce.
I set up a hands-on lab
for undergraduate students this week. The theme was the later Homin traditional
tool industries. I used many replicas I have fashioned over the years ranging
from rawhide cordage, wooden throwing sticks, and shell fishhooks, to Solutean
style bifaces, composite cane arrows, and flint-and-iron pyrite fire sets. The
lab was a huge success and I feel like students really got a feel for how our
direct Anatomically Modern Home sapiens
ancestors diversified their hunter-gatherer toolkits to an exquisite level
during the Late Stone Age/ Upper Paleolithic, and beyond.
One tool I emphasized
in particular was the snare. Traps (whether gill nets, dead falls, snares, pit
falls, etc.) effectively allow a single hunter to take game in over twenty
locations at the same time, while he or she is asleep. Talk about a brilliant
use of resources!
One snare I present to
you today, I learned when I was twelve years old. My cousin’s ex-boyfriend Jugo
grew up in the jungles of El Salvador and used to fashion these snares to catch
feral chickens in the forest (as he described, chickens would routinely escape
the villages, make their way into the jungle and breed for generations). Sounds
pretty good from a forager’s perspective huh? Anyways, when Jugo heard that I
was interested in hunting, fishing, and bushcraft he borrowed my machete,
grabbed a piece of nylon string and some bird seed and walked me into the woods
to show me how it was done.
WARNING-Snares
are designed to severely injure and kill! These are not toys. If you set them
in urban or suburban areas you will likely catch the neighbor’s dog or cat, and
believe me it will NOT be
funny! They will be severely injured or, more likely, dead! Please remember that “with great power comes great
responsibility!” Again the power to kill is significant and demands that the
forager wield this power with strict ethics and morals. Personally, I do not often
use snares because they are indiscriminant killers. The snare does not care if
it catches the rabbit or the fox tracking the rabbit. I am a selective hunter,
so I only use snares if my life depends on it…in which case, fox would taste
just as good as rabbit.
That being said, if
your life did depend on it, knowing how to fashion effective hunting
technologies from only the materials the wilderness provides, is a skill I
highly recommend acquiring…especially if you are a hiker, backpacker, back
country hunter, or angler. Spend enough time in the woods and I am sure you
will, as I have, get turned around once or twice. The trick is to stay calm and remember this… “If you get
lost, stop and build a house…now you are not lost, you are home!” Now, maybe
building a house in the woods is impractical, but the bottom line is that if
you are at home in the woods, getting lost might feel more like an opportunity
than a predicament. So here are a few tools you can fashion to feel more at
home in the woods.
Pay close attention to
these snares. Remember, gathering is easier than fishing if you know your
plants (so learn them). Fishing is easier than hunting if you know how to make
and use fishing tackle (so practice before your life depends on it). Hunting is
easier than dying (so take notes on these snares, make them, trigger them, and
dismantle them before you catch the neighbor’s dog). Bottom line “the more you
know, the less you have to carry.”
Snare
#1 The classic neck-noose spring pole.

Snare Set and Waiting for Game
Alright, for this one
you better know how to twine cordage from inner tree bark or plant fibers (and
if you don’t please comment and I will happily post on the subject), or know
you can tear a strip of cloth from the bottom of your T-shirt, or use ½ of a
shoe lace (leaving you with the other 1/2 for ankle support), or go with the deadfall
shown later in this post.

Cattail Leaf Cordage
One advantage to using
hand twined plant fiber cordage is that these nooses blend into their
surroundings surprisingly well when they are made from materials that naturally
occur in the area (see the bird fence snare later in the post for an example of how twined cattail leaf blends into it's surroundings).
These snares rely on a
knowledge of the habits of small game and proper placement along game trails.
This particular snare also relies on the ability of a hardwood bough to bend
and store spring power over long periods of time, and a tough smooth cord to
constrict quick and tight when it counts. Not all materials will work for these
tasks, so some experimentation in various settings may be necessary. I have had
good luck with most hardwoods for the spring pole though, so keep that in mind.
Step 1- locate a well
traveled small game trail

Game Trail

Game Sign aka. doodoo
Step 2- locate a
hardwood tree growing beside the trail and remove branch-lets from a bough
roughly 1-2 inches in diameter (make sure it flexes and whips back into place).
Or you can cut a hardwood pole, sharpen one end, and drive it deep into the
ground (about 4ft from the trail- it needs room to bend) if a tree is not
growing close enough.

Potential Hard Wood Spring Pole
Step 4- Sharpen one end
of the small branch-lets you removed from the main pole, and drive them into the
ground along the trail effectively making a closely spaced fence on both sides.
The concept here is if a rabbit comes along it will be funneled directly into
your snare.

Trimmings Ready For Making Steaks

Sharpened Steak

Fence/Funnel

Keep Steaks Spaced Tightly So Rabbits Must Go Through Snare
Step 5- Carve your
trigger from 2 hardwood sticks and drive the base of the one deep enough into
the ground that it will stay in place with the tension of the bent bough
attached when the snare is set. See below for
a close up of the trigger. If you need more pointers than that image, you
probably shouldn’t be trying this anyways ;)

Trigger

Close Up of Trigger
Step 6- tie a simple
noose on one end of your cord or snare wire. Tie the second half of the trigger
1 ft from the noose (when the noose is completely constricted…it should open to
a loop of about 6” diameter when trigger is set).
Step 7- Set the trigger
in place and put tension on the string while carefully bending down the pole to
meet it. When you feel it will have enough whip behind it, stop bending and mark
where you need to tie off the other end of the cord. BE CAREFUL- if you are
not, this spring pole can whip your face pretty bad. Tie cord to the end of the
spring pole.
Step 8- CAREFULLY set
the snare so that the loop will be open when a rabbit comes charging through.
You can use some very small diameter twigs or grass stalks to help keep the
loop open.

Ready

Tension

Triggering

Noosed!
Now go away! You won’t
catch anything standing there smelling up the place with your human rabbit
deterrent!
This snare works
beautifully…like this…rabbit runs through the narrow area in the trail directed
by the fences, runs through the noose which tightens on its neck, when the
rabbit feels this it tries to break free which sets off the trigger releasing
the spring pole with sufficient energy stored to whip up rapidly and snap the
rabbit’s neck. Sounds brutal huh? That’s because this is real nature, not
Disney nature. If it makes you feel better, just know, rabbits do not die of
old age in the wild; it’s called getting older and slower.
Note-
As you might imagine, it is not a good idea to test this snare, as some youtube
“survivalists” do, by noosing your forearm. If your snare is weak enough that
you are even entertaining the idea of
putting your hand in there, you need a better spring pole!
Snare
# 2- The Simple Quail Loop and Fence

Can You Even See the Nooses?
This is the easiest
snare I know, and it works wonders with ground-dwelling birds.
Step 1- locate a good
quail run in the brush with natural vegetation and topography to direct the
birds into your trap (you can set 1000 snares in the wrong places and catch
less than 1 snare placed in the right
place).
Step 2- make a fence
just like you did above, but space the twigs closer together as quail are
smaller than rabbits. Also widen the fence out and place it in a half circle
configuration with three or more 4 inch gaps that correlate to natural paths
the birds are using.
Step 3- Making sure the
steaks closest to the gaps are pounded into the ground until quite secure; tie
the proximal ends of 4 inch diameter nooses to them.

Plant Fiber Cordage Blends in Really Well!

Ready for Quail!
Step 4- Spread out the
nooses using a little dry grass for support if needed so they are open and will
constrict around the quails necks when you drive them through.
Step 5- Bait the
enclosure with seeds, nuts, etc. Now hide. When you see quail moving near the
snare, move slowly towards them. You want them to know you’re there, but not
get so alarmed they fly away. Quail will rely on running as long as possible.
When they see you they will turn and head in the opposite direction, funneled
into the half circle fence and will bee-line for the path of least resistance…
the 4 inch gaps, at full speed. The bottom of the nooses should hit them about
chest-height; the top will slip over their head. The noose will constrict as
they panic and the more they struggle the faster they will snap their own necks
or you can retrieve and dispatch them by hand. Brutal right? But it works, so
if you get lost and it’s you or them, give it a try!
Trap
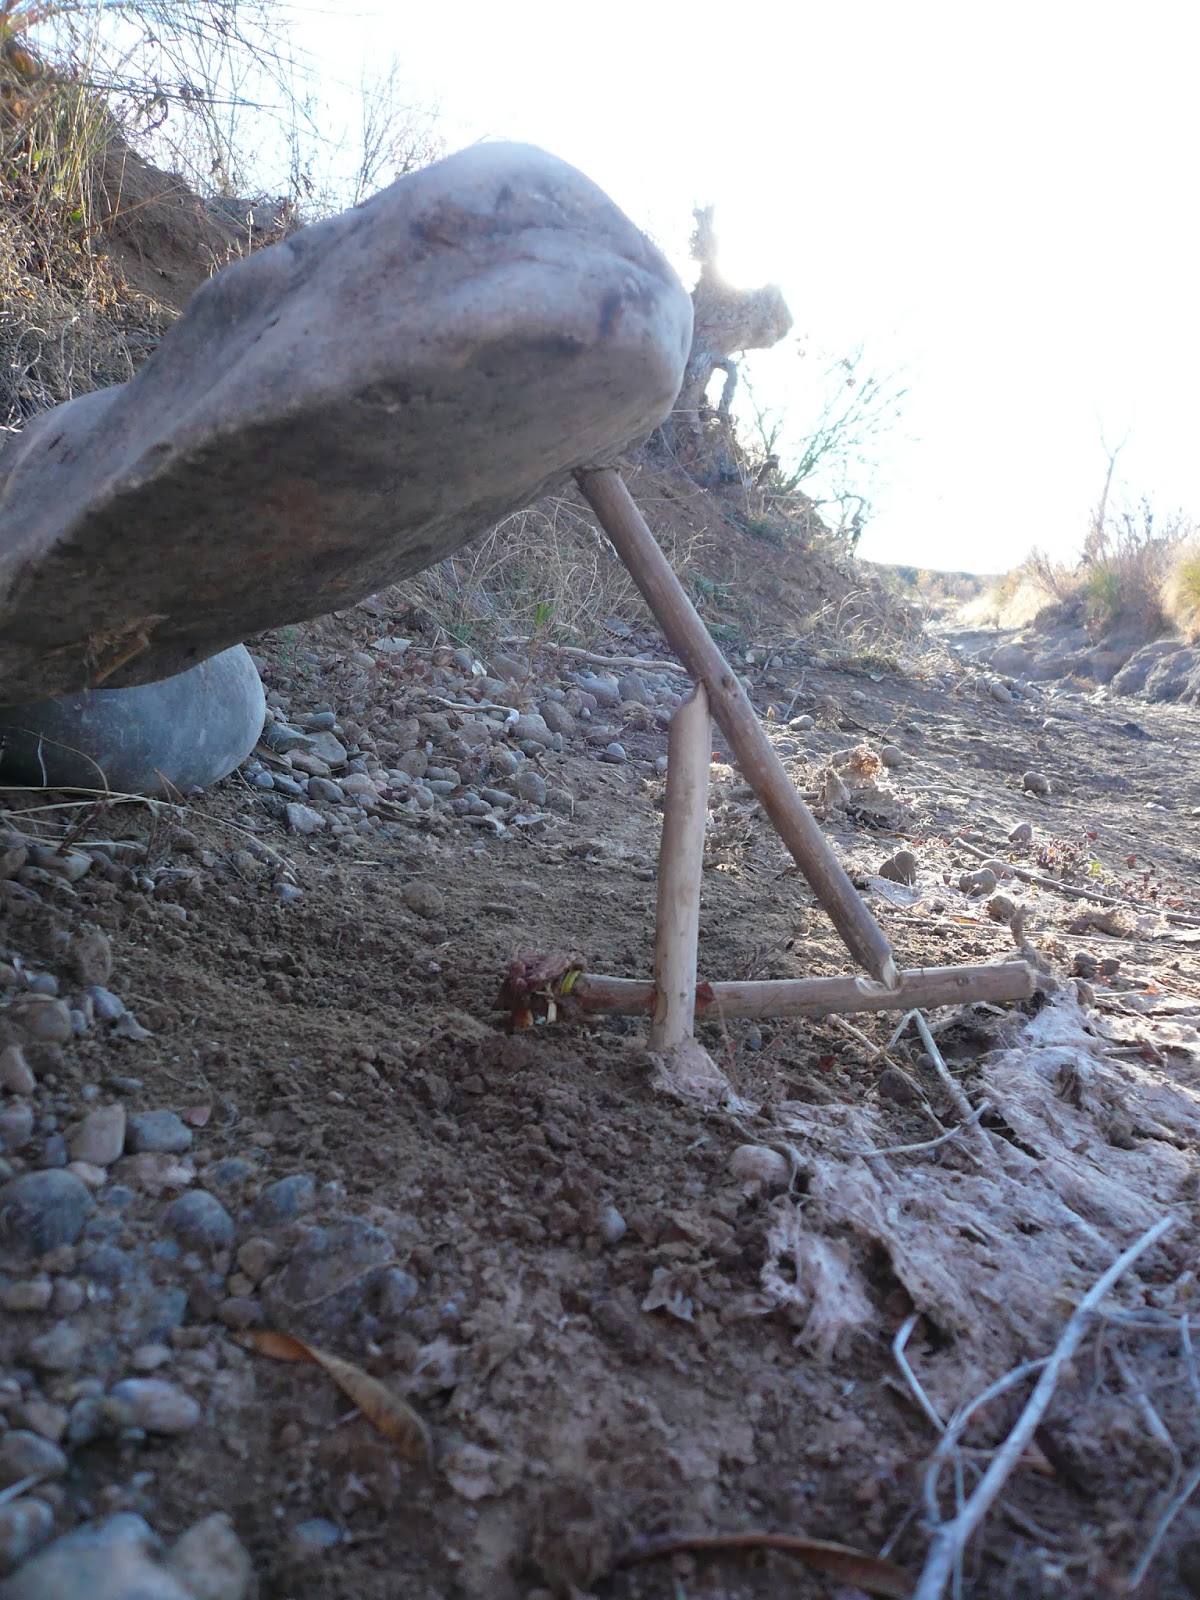
3- The Figure Four Deadfall

Set Deadfall!
There are many types of
deadfalls. These can rely on the dead weight of whole trees or large flat
stones. The concept is crushing the game to death, which as you might imagine,
runs the risk of spoiling some good meat. That said, you can set 10 of these
using large logs over deer trails if your life depended on it and you might be
glad you did.
Step 1- Locate your
game trail (are we seeing a trend yet?)

Rabbit Trail

Rabbit Tracks
Step 2- Locate a large
flat stone and three 1 foot long sticks around ½ inch in diameter (if you want
me to show you the log variation, please comment and I will happily do so). You will have to cut these sticks to appropriate sizes I the coming steps.
Step 3-You need to
whittle the trigger sticks so they match the images here.

View 1

View 2

View 3

View 4

View 5
Step 4 (optional) - Tie
a piece of bait to the trigger end. This will have to match the dietary
preference of your intended prey. Meat for raccoons, foxes, weasels, etc. pine
nuts or acorn for squirrel, etc. This is optional because if you set this on a
small game trail, all it takes is a rabbit bumping the trigger as it hops along
and it will set the trap off.
Step 5-Lift one side of
the stone and CAREFULLY set the trigger as shown. Try not to crush your hands
doing it!

Ready? Set? Deadfall!

Perspective 2

Trigger Set
Step 6- Go away stinky
human! Set more traps elsewhere.
Step 7- when the trap goes off...you bring home the small game bacon!
Don't Let Your Hand Be Under There!
Well folks, there you have it. Three basic snares that can literally save your lives! Tools such as these were common knowledge for our ancestors, so let’s learn them again out of respect for the intimate connection our predecessors had with their food, and the materials that surrounded them every day in their natural environment.
Keep the old ways
alive!
No comments:
Post a Comment